Quick Start Guide¶
1. Download The Development Kit¶
Download the BrainStem Development Kit (BDK) for your particular operating system and architecture.
Download HubTool for your particular operating system and architecture.
2. Connect Devices¶
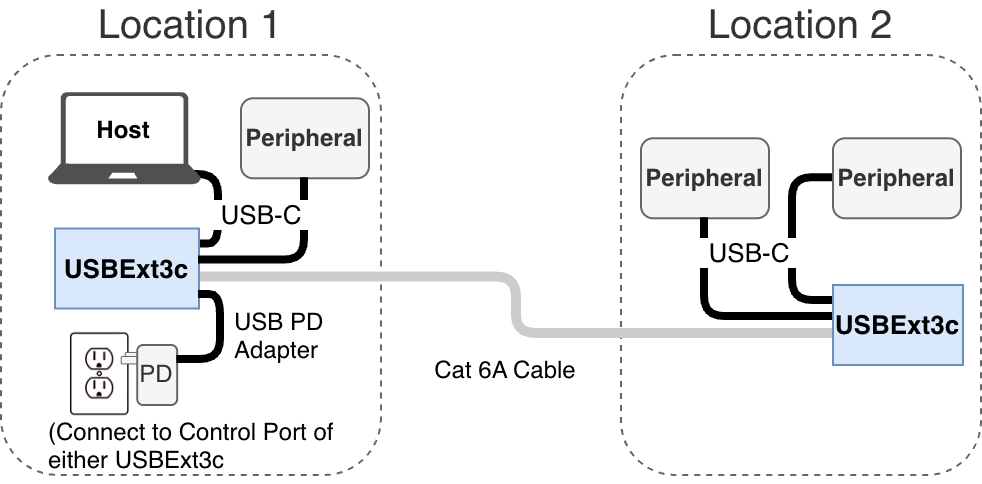
Extension Setup
Position devices at the desired locations. Devices are identical and can be placed on either end of the extension.
Connect their HDBaseT-USB3 ports with a Cat6A cable (not included in the kit).
Power Connection [*]
Connect the included 100 W USB-PD power adapter to any available [†] USB port on either USBExt3c. The other extender and attached devices will be powered over the extension link.
Host and Peripheral Connections
Connect the host device to Port 0 or Port 1 via included USB-C cable.
The USBExt3c will automatically detect when a host-capable device has connected and set the corresponding port to be Upstream-Facing.
Connect peripherals to other available ports 0 or 1 on either end of the extension link via USB-C .
Confirm that peripherals are visible to the host computer.
3. Connect with HubTool¶
Open HubTool on the host computer.
On the bottom right side of the application, select the USBExt3c device to connect.
Once the connection is established, the second USBExt3c device will also appear on the bottom right .
Note
Linux users will need to run the script labeled “udev.sh” located in the “BrainStem_linux_Driverless” folder before they will be able communicate with a BrainStem device.
Congratulations! You are now ready to start exploring the capabilities of the USBExt3c. For more information please take a look at our Getting Started Guide