OVERVIEW
Potentiometers are commonly used in applications where accurate manual adjustment of a setting is required. The potentiometer changes its resistance depending on the location of the knob, causing a change in voltage that can be read and used to change a value. This example demonstrates how to use a potentiometer to trigger an event, the toggling of the User LED. The User LED will be turned on after the potentiometer reaches a certain resistance.
BrainStem application examples require the BrainStem Support package.
THE SETUP
There are several hardware components needed for this example:
- 40-Pin EtherStem 1.0 Module
- 40-Pin Breakout Board
- Ethernet Cable
- Potentiometer
POTENTIOMETER
A potentiometer is a resistor that utilizes a sliding contact, called a wiper, to form an adjustable voltage divider. Potentiometers were designed to measure electric potential, but can act as variable resistors if only two of its three terminals are used. An advantage of potentiometers is the output is able to be varied from ground to maximum voltage depending on where the wiper is located.
CONFIGURATION
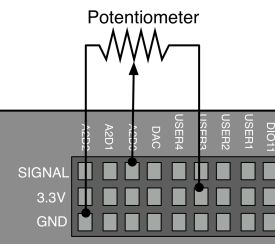
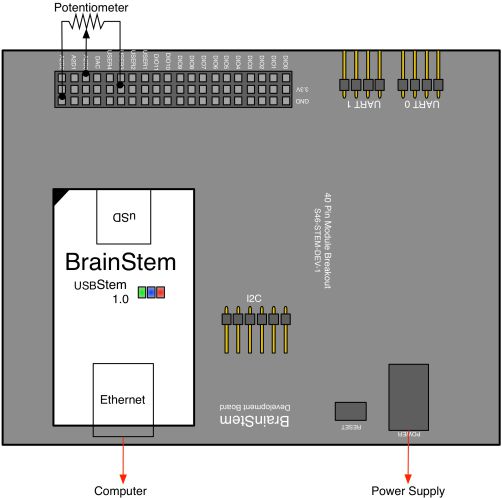
Connect the BrainStem to the Development board with a power supply connected and an Ethernet cable connecting the BrainStem to the host computer. Connect the potentiometer to the 3.3V pin, an A2D pin [A2D0 for this example], and ground.

Detailed View

Wiring Diagram
READING ANALOG WITH REFLEX
The voltage of analog pins can be read using the Voltage entity of the Analog class. With the Voltage entity, the voltage of the analog pin can be stored in a variable that can then be compared to a threshold. Once the variable passes the threshold, the System class is used to turn the LED on using the LED entity. The Sleep entity of the System class is then used to slow the loop process.
READ A POTENTIOMETER
#include <a40PinModule.reflex>

a40PinModule stem(a40PINSTEM_MODULE);

reflex mapEnable()
{
  short bPhotoState = 0;
  char i = 0;
  short toggleVoltage = 5000;

  while (i < 100) {

    stem.analog[0].getVoltage(bPhotoState);
    cmdDEBUG(bPhotoState);

    if (bPhotoState < toggleVoltage) {
      stem.system.setLED(1);
    }

    else {
      stem.system.setLED(0);
    }

    stem.SYSTEM.sleep(1000000);
    i = i+1;

  } // end of while loop
} // end of mapEnable
Line 11 - Beginning of a while loop that iterates 100 times.
Line 13 - Reads voltage of analog pin 0.
Line 15-17 - If statement that turns the User LED on if the voltage is low.
Line 19-21 - If statement that turns the User LED off if the voltage is high.
Line 23 - 1 second sleep to keep the iterations at a reasonable pace.


