Docker Technology to Spin up Small, Isolated Environments
At Acroname, we hate it when customers have issues with software and that’s why we provide deployments for Windows, Mac and Linux across various architectures. Amongst those deployments we also offer application programming interfaces (API’s) in C/C++, python 2/3, LabVIEW and .NET. This article will demonstrate how to use Docker containers with Acroname devices.
Docker is many things, but its core functionality is an operating system virtualization technology, that can spin up small, fixed, and isolated environments. Docker is capable of running on most modern operating systems but for the sake of this example I will be using the Linux variant. The rest of this tutorial will assume that you have Docker installed and have a basic knowledge of its usage.
Define the Needed Docker Image
This example will use Acroname's Python API. This requires an image which contains both Python and the BrainStem .whl library. Below is a Dockerfile that will create such an environment. The BrainStem Ubuntu 20.04 SDK package must be downloaded and included in the same directory as the Dockerfile.
1 2 3 4 5 6 7 8 9 10 11 12 |
FROM python:3.9-slim-bullseye RUN apt-get update && apt-get install -y curl && \ rm -rf /var/lib/apt/lists/* # Users should download the latest Ubuntu 20.04 SDK package and put it in the # same directory as the Dockerfile. ADD brainstem_dev_kit_ubuntu_lts_20.04_*.tgz /opt/brainstem RUN pip install /opt/brainstem/development/python/brainstem-*.whl WORKDIR /opt/brainstem |
Create the Docker image
Using the above dockerfile an image can be created with the following command:
sudo docker build -t acroname/python_container -f Dockerfile.acroname_python ./
Explore the image
Now that the image is successfully built, it can easily be explored with the following command:
sudo docker run -it acroanme/python_container /bin/bash
As defined in the dockerfile Acronames's BrainStem Development Kit can be found at "/home/downloads/brainstem". Any python examples run at this point will fail because the python API will not be able to find any devices.
Passing devices into the container
Now that we have a working image we need to get our device into it. There are two methods for this: the easy way which takes the shotgun approach by pulling in all USB devices, or the harder way which is much more surgical and secure by only including devices we need.
The easiest way to get devices into a Docker container is to simple give the container access to all USB devices and then use the "--privileged" flag. This tactic is only recommended for debugging and proof of concept as you are giving the container full access to the USB tree; defeating the purpose of a container.
sudo docker run -it --privileged -v /dev/bus/usb:/dev/bus/usb acroname/python_container /bin/bash
At this point if you have an Acroname device attached you should be able to successfully execute one of the python examples located at: "/home/downloads/brainstem/development/python_examples".
The recommended way to do this is to use the "--device" flag and only pass in the device needed. This example I will use the USBHub3p (S79) as the device to pass in. The USBHub3p has 3x hub chips within it; each of which will enumerate as an endpoint. If the host supports USB 3.0 3x endpoints for USB 2.0 and 3x endpoints for USB 3.0 will appear, followed by a 7th endpoint which represents the "stem". The stem is Acroname's communication channel to the device. This is the endpoint we want to pass into the container. To find all Acroname devices on a Linux machine execute:
lsusb -d 24FF:
24FF is Acroname's Vendor ID, assigned by USB-IF.
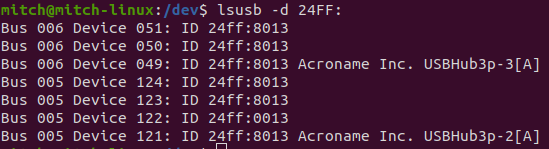
Figure 1
In Figure 1 the 7x Acroname (24FF) endpoints as described above can be seen. Notice that most of the ID’s are all the same with the exception of 1x: 24FF:0013. The format of this ID is: [idVendor]:[idProduct]. 0x13 is the model number of the USBHub3p. All other endpoints are internal hub chip endpoints. These have been prefixed with the number 8 to identify them (8000 | 0013 = 8013). Keep in mind that this is product-specific; For a USBHub2x4, the model number is 0x11. The resulting value would be 24FF:0011. If multiple devices of the same type are connected or if uncertain the “-v” option will provide more information:
lsusb -d 24FF:0013 -v
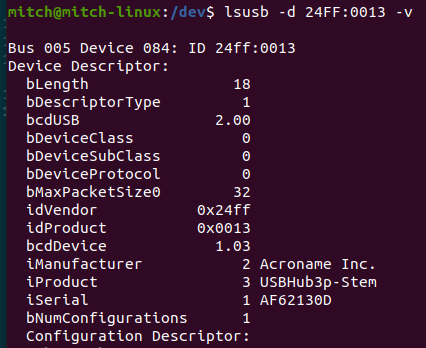
Figure 2
The stem device will always have an iProduct of: “${Product_Name}-Stem”
Looking at Figure 1 again a “Bus” and a “Device” are defined for each endpoint. This is the device address used to pass into our Docker container, resulting in:
sudo docker run -it --device /dev/bus/usb/004/112 acroname/python_container /bin/bash
Please keep in mind that the operating system (OS) has complete control of the device mapping and at anytime and for any reason (typically when devices are added and removed) it can decide to change this mapping. This will result in a loss of access to the device within the container. There are ways to adapt to these changes; however, this is outside of the scope of this article.

Add new comment