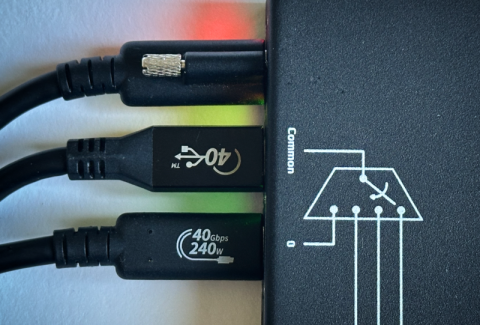
USB-C-Switch Pro is a managed USB-C path selector. It connects the Common channel to one of four Mux channels and appears to the attached host and device as a USB-C cable rather than a hub.
With a normal USB-C cable, the devices on each end detect plug orientation and configure their internal muxes to route signals to the correct pins. USB-C-Switch Pro sits in the middle of that connection. Each switch port has two possible connector orientations, so a Common-to-Mux path has four possible orientation combinations. Only the plugs at the switch matter: the plugs at the host and monitor can go in either orientation, since those endpoints detect and adapt normally.
Because USB-C-Switch Pro uses directional redrivers, not every combination supports every operating mode. USB, 4-lane DisplayPort Alt Mode, and 2-lane DisplayPort Alt Mode with USB 3.x enabled use the USB-C high-speed lanes differently. The redriver direction must match the active lane usage.
For a given Common-to-Mux path, symmetry means two of the four possible orientation combinations support USB 3.1 and 4-lane DisplayPort Alt Mode. 2-lane DisplayPort Alt Mode with USB 3.x works with only one of those two.
We recommend working out cable orientation interactively in HubTool before writing automation scripts. Even if you are only using 4-lane DisplayPort Alt Mode, it is worth getting the cables into the right orientation to support all modes.
Internally, we refer to this connector flipping test as the "cable dance."
Required hardware
- A USB host that supports DisplayPort Alt Mode
- A control computer with HubTool installed (this could also be the host)
- A USB-C DisplayPort Alt Mode monitor or sink
- USB-C-Switch Pro
- USB-C cables that support DisplayPort Alt Mode at the required resolutions. We recommend 40 Gbps cables.
Connections
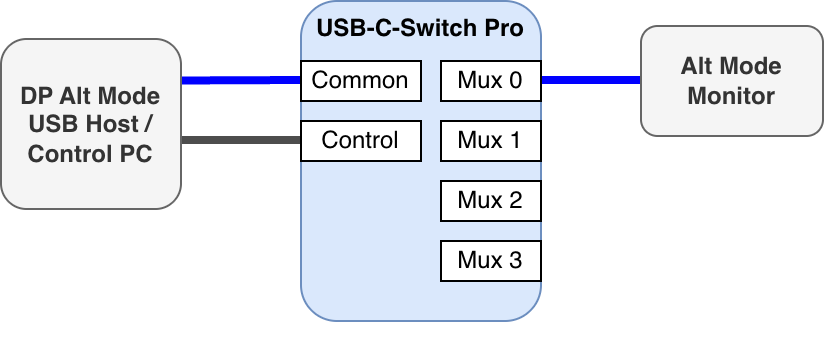
- USB host → Common port
- Control computer → Control port (often the same machine as the host, but can be separate)
- USB-C DisplayPort Alt Mode monitor → Mux 0
- DC in → optional power adapter (press firmly to seat). Without it, the switch is bus-powered over the Control port.
In HubTool, the left pane corresponds to the Common port and its controls; the right pane corresponds to the Mux ports.
Note: USB-C-Switch Pro defaults to USB 3.1 mode and will not pass DisplayPort Alt Mode signals until a DP mode is explicitly selected in HubTool. The steps below establish the correct cable orientation first, then select the appropriate DP mode.
Step 1: Find the Common-to-Mux relative orientation
This step determines the relative orientation between the Common-side cable and the selected Mux-side cable. It reduces the four possible orientation combinations to two.
- In HubTool, select USB-C-Switch Pro.
- From the System tab, reset the switch to a known default state.
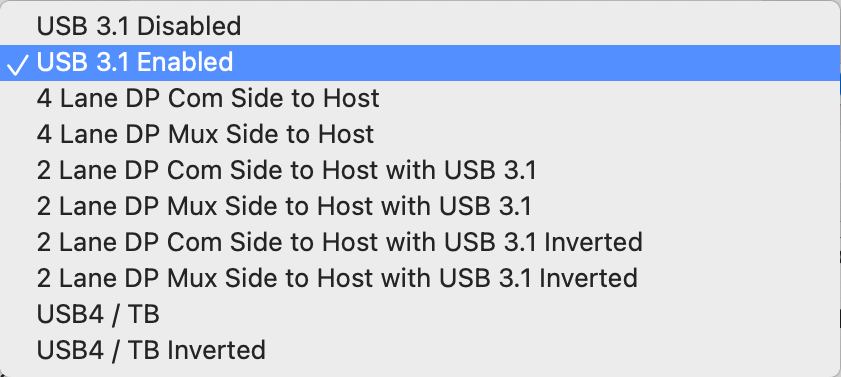
- In the Alt Mode section, confirm that USB 3.1 Enabled is selected.
- Select Mux 0.
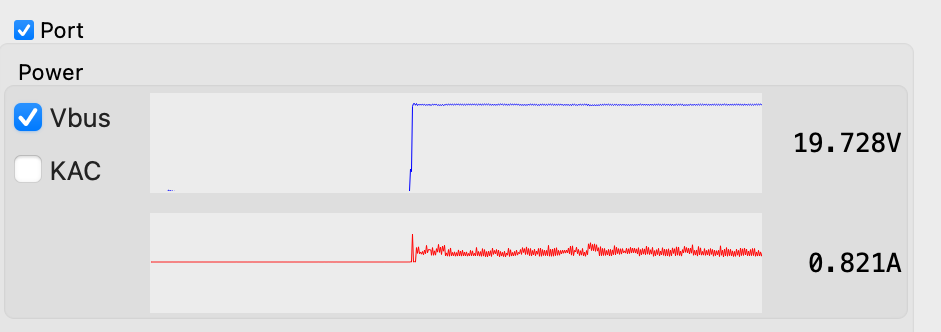
- Observe VBUS.
If Common VBUS reads ~ 0 V, flip one connector at the switch: either the Common-side connector or the Mux-side connector. Do not flip both connectors in this step.
When the relative orientation is correct, VBUS should jump to 5 V, then jump again to the negotiated PD voltage if USB-PD is active.
Step 2: Find the Common-to-Mux absolute orientation
This step uses CC voltage to determine which of the two remaining orientation combinations supports non-inverted 2-lane DisplayPort Alt Mode.
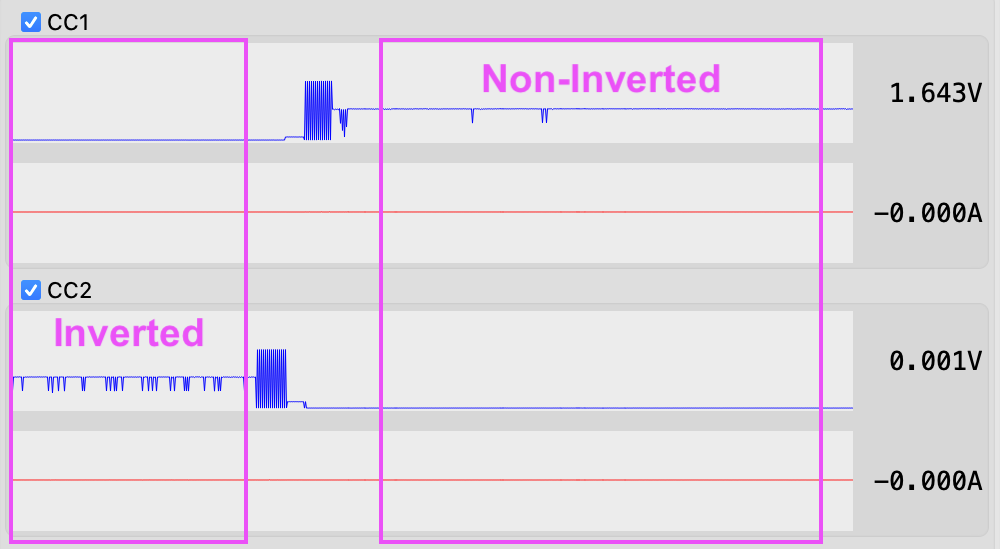
- In HubTool, observe CC1 and CC2 on both the Common and Mux ports.
- If CC1 ≈ 1.6 V and CC2 ≈ 0 V on both ports, the absolute orientation is correct. Proceed to Step 3.
- If CC1 ≈ 0 V and CC2 ≈ 1.6 V on both ports, flip both the Common-side and Mux-side connectors at the switch, then verify that CC1 ≈ 1.6 V and CC2 ≈ 0 V on both ports.
Step 3: Confirm with a monitor
Set the monitor to the mode that enables USB 3.x data while using DisplayPort Alt Mode. On some Dell monitors this is in the OSD under USB-C Prioritization → High Speed Data.
Note: some monitor OSDs only expose this menu when an active USB-C source is connected. If the option is missing, connect the monitor directly to a host with a USB-C cable to configure it, then move the cable back to the switch.
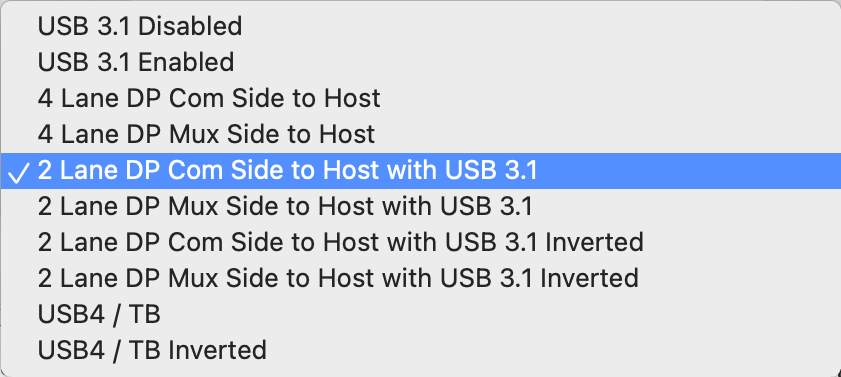
- In HubTool, select 2 Lane DP Com Side to Host with USB3.1.
- Observe whether the monitor connects.
If the monitor connects, the cable orientations are correct.
If the monitor does not connect, flip both the Common-side connector and the Mux-side connector at the switch, then retry the same mode.
Once this step succeeds, the orientations for both the Common and Mux 0 connectors are correct. Keep the Common-side connector orientation fixed for any additional Mux port connections.
Step 4: Configure additional Mux ports
For each additional Mux port:
- Leave the Common-side cable orientation unchanged.
- Select the Mux port in HubTool.
- Connect the device to that Mux port.
- Observe VBUS.
- If VBUS is approximately 0 V, flip only the Mux-side connector at the switch.
Once the Common-side orientation is established, do not change it while configuring the remaining Mux ports.
Reverse configurations: if the host is on a Mux port and the monitor is on Common, the same procedure applies — select the corresponding "Mux Side to Host" alternative in the HubTool Alt Mode menu instead of the "Com Side to Host" mode used in Step 3.
Procedure summary
Setup:
  USB host         → Common port
  DP Alt Mode sink → Mux 0
  Control PC       → Control port

Step 1 — Relative orientation (VBUS):
  Reset the switch. Confirm USB 3.1 Enabled. Select Mux 0.
  Read VBUS.
    if VBUS ≈ 0 V:
        flip ONE connector at the switch (Common-side OR Mux-side, not both)
  VBUS should jump to 5 V, then to the negotiated PD voltage if USB-PD is active.

Step 2 — Absolute orientation (CC voltage):
  In HubTool, observe CC1 and CC2 on both the Common and Mux ports.
    if CC1 ≈ 1.6 V and CC2 ≈ 0 V on both ports:
        orientation is correct, proceed to Step 3.
    if CC1 ≈ 0 V and CC2 ≈ 1.6 V on both ports:
        flip BOTH the Common-side and Mux-side connectors at the switch.
        verify CC1 ≈ 1.6 V and CC2 ≈ 0 V on both ports.

Step 3 — Confirm with a monitor:
  Set the monitor to its USB 3.x + DisplayPort mode
    (labels vary: "High Speed Data," "USB-C Prioritization," etc.).
  In HubTool, select: "2 Lane DP Com Side to Host with USB3.1"
  Does the monitor connect?
    yes: Common-side orientation is now established.
    no:  flip BOTH the Common-side and Mux-side connectors at the switch.
         Retry the same mode.

Step 4 — Additional Mux ports (Mux 1..3):
  Leave Common-side cable orientation unchanged.
  Select the Mux port. Connect the device. Read VBUS.
    if VBUS ≈ 0 V:
        flip only the Mux-side connector at the switch.
Key setup rule: after the Common-side orientation is established, leave it fixed. Configure additional Mux ports by changing only the Mux-side connector orientation when needed.
Add New Comment